Tile Calculator
Calculate tile, thinset, grout and spacers, then see where the border cuts land.
Tile Project Details
Common jobs
Area Length (ft)
Area Width (ft)
Tile Size
Before you pay
Check every box carries the same batch number, and ask whether the shop takes unopened boxes back. That answer decides how hard you round up, and it is the difference between one spare box and four.
Estimates only. Not professional advice.
Tiles to buy
132tiles
12"×12" porcelain in a straight layout, covering 132 sq ft once the cut allowance is in.
- Tile size
- 12"×12" at 1 sq ft each
- Cut allowance
- 10% waste + 0% pattern
- Tile spacers
- 3 bags
- Bare area, no waste
- 120 sq ft
- Porcelain Tile material
- $396 – $1,320
Coverage assumed: about 10 sq ft per box, 80 sq ft per 50 lb thinset bag, 200 sq ft per 25 lb grout bag, 50 sq ft per bag of spacers.
Dry lay
Tile layout: where your border cuts land
Tile count tells you what to buy. This tells you what the floor will look like. Rooms almost never divide into whole tiles, so one wall ends up with a cut strip, and if that strip is thinner than half a tile the whole floor reads as a mistake. Nothing here changes your order above.
Both border courses come out over half a tile wide, so a flush set-out from the longest straight wall is fine here. Balancing this room would only add 19 more pieces on the saw for no gain. Snap your lines off that wall, not off the doorway.
Written and reviewed by
Creator
Hawkin
Certified Cost & Estimating Professional
AACE-certified estimator working with 20+ insulation companies including the two largest franchises in America.
See full profileExpert Review
Ehsan Ghazanfari
Licensed Structural Engineer
FISE-certified structural engineer with 11+ years designing bridges, retaining walls, and foundations. MSc from Aalto University.
See full profileUpdated August 3, 2026
How we verify our calculatorsCut schedule
- Border, along length
- 10.6 in
- Border, along width
- 10.9 in
- Courses
- 12 × 10
- Pieces to cut
- 21
- Wet saw run
- 22 ft
- Half a tile is
- 6.0 in
Setting out
How much tile do you need: from room size to boxes
Tile is bought by the box and cut on site, so the number you order is never just the floor area. Between the two sit the cut allowance, the pattern you picked, and whether the shop will take an unopened box back.
- Field tile
- Area divided by the coverage of one tile. A 12×12 covers 1 sq ft, a 6×6 covers a quarter of that, so the same room can mean 130 tiles or 520.
- Cut allowance
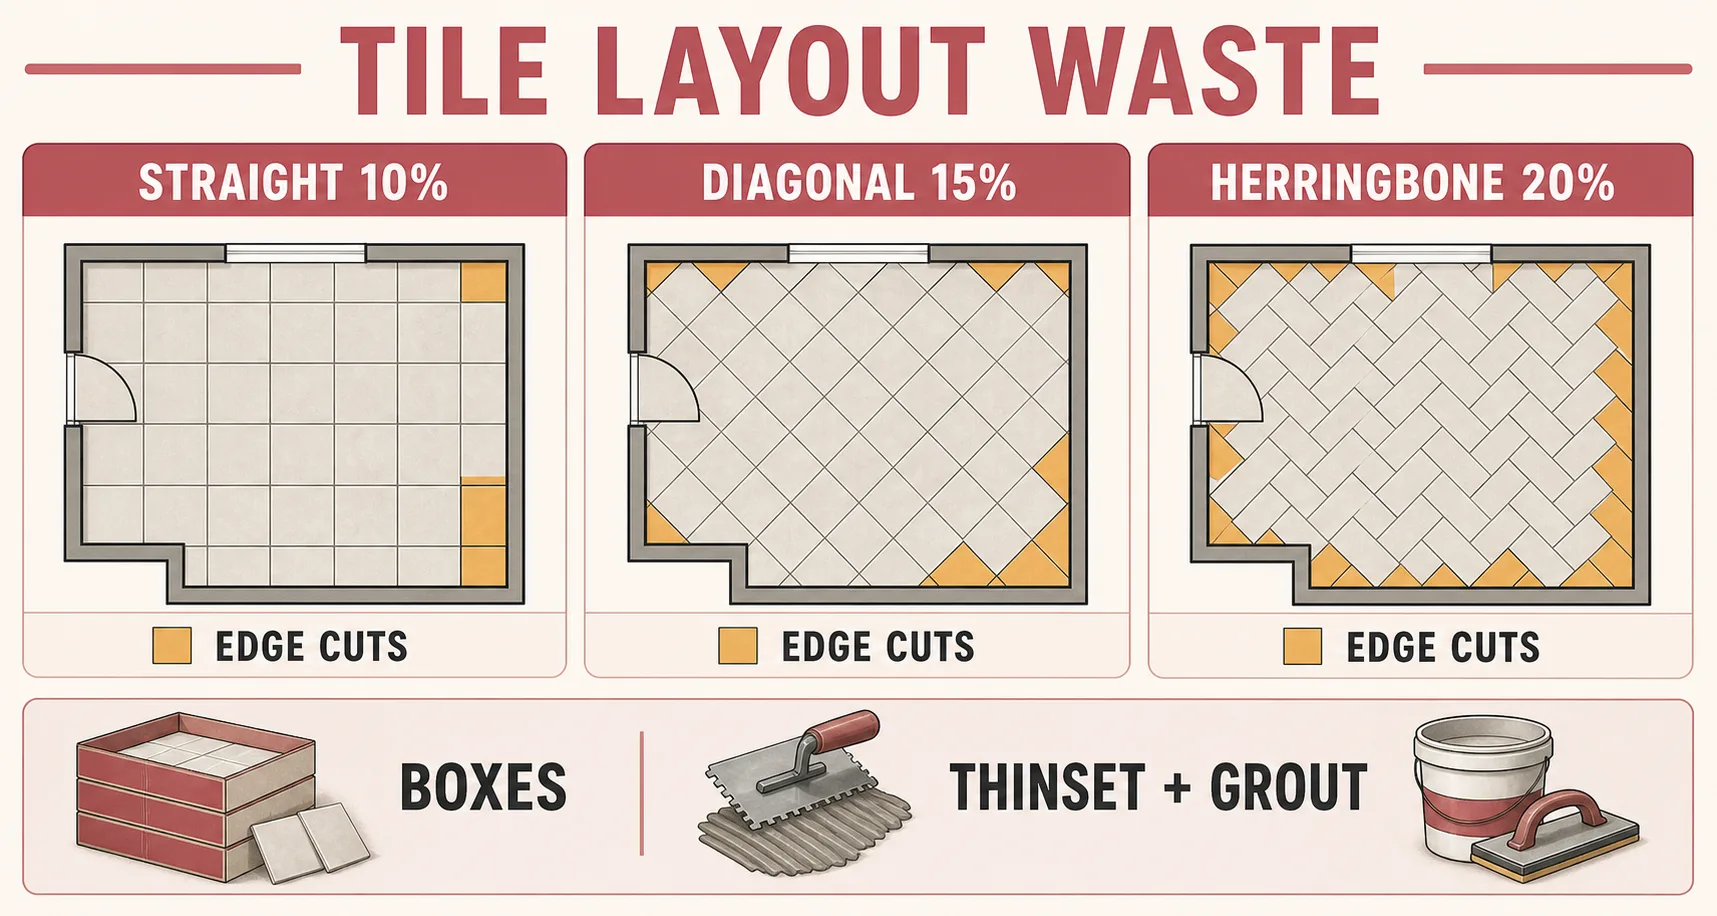
- 10% on a straight floor. Add the pattern penalty on top: 5% for diagonal or brick offset, 10% for herringbone, because every edge piece leaves an offcut you cannot use elsewhere.
- Thinset
- About 80 sq ft per 50 lb bag with a 1/4 inch notch. Switch to a 1/2 inch notch for large format and that halves.
- Grout
- About 200 sq ft per 25 lb bag at 1/8 inch joints on 12×12. Smaller tile or wider joints eat it much faster, because grout volume follows joint length, not floor area.
- Spacers
- One bag per 50 sq ft, in the joint width you actually committed to. Buying 1/8 inch spacers then deciding on 1/16 inch means buying twice.
- Trim and bullnose
- Counted in lineal feet, not square feet, and almost always forgotten. Measure every exposed edge, step nose and inside corner before you leave the shop.
At the counter
Five things to check on the boxes before you pay
Tile is a batch product. Two boxes of the same item number can differ in shade and in actual size, and neither is a defect you can claim later.
| Check | Why it matters | If you skip it |
|---|---|---|
| Batch or lot number | One firing run. Shade drifts between runs even on the same item code. | A visible stripe across the floor where the second batch starts. |
| Shade code | Printed separately from the batch on most porcelain. Sorts colour within a run. | Patchy areas that only show once the floor is grouted and dry. |
| Caliber | The actual size band. A nominal 12 in tile ships as 11.9 or 12.1 depending on caliber. | Joints that wander, because your spacers assume one size and the tile is another. |
| Box count and sq ft per box | Boxes hold a stated area, not a stated tile count, and it varies by maker. | Ordering by box and landing short by half a room. |
| Returns policy on full boxes | Decides how hard you round up. Some shops take unopened boxes, some do not. | Either a shortfall mid-job or four spare boxes you own forever. |
Pull from three or four boxes at once as you set, whatever the codes say. It spreads any remaining variation across the floor instead of concentrating it in one corner.
Trowel work
Tile installation tips, in the order you use them
Numbered because the sequence is the point. Every one of these is settled before the step after it, and none of them can be revisited once the mortar goes off.
- 01
Flatten the substrate first. A floor that is out by 1/8 inch over 10 feet will show as lippage under large tile, and our self-leveling concrete calculator sizes the leveler and primer for that prep.
- 02
Snap your layout lines and dry lay one course each way before any thinset comes out of the bag. Two minutes with a chalk line is what decides whether the border cuts look deliberate.
- 03
Install a waterproof membrane in every wet area, showers, tub surrounds and bathroom floors included. Thinset and grout shed water, they do not stop it.
- 04
Check that every box carries the same batch or dye lot number, then pull from three or four boxes at once as you set. Two lots can differ enough in shade to read as a stripe across the floor.
- 05
Match the trowel to the tile, not to the bag. A 1/4 inch square notch suits tile up to 12 inches; anything 12x24 or larger wants a 1/2 inch notch and thinset combed on the tile back as well.
- 06
Use leveling clips on anything over 12 inches. They pull neighbouring edges flush while the mortar is still soft, which is the only moment lippage is fixable.
- 07
Give thinset a full 24 hours before you grout. Kneeling on green mortar shifts tile out of line and the bond never recovers.
- 08
Sizing grout on its own, or comparing tile against plank and carpet? The grout calculator works from joint width, and the flooring calculator covers the other materials.
Notch size
Thinset coverage by trowel notch, and what each one is for
Trowel choice follows tile size, and it moves your bag count more than anything else on this page. One 50 lb bag, spread on a flat substrate.
| Notch | Per 50 lb bag | Use it for |
|---|---|---|
| 3/16 in V-notch | 130 sq ft | Mosaic and sheet tile up to 4 in |
| 1/4 in square | 95 sq ft | Wall tile and floor tile to 8 in |
| 1/4 x 3/8 in square | 80 sq ft | 12x12 floor tile, what this calculator assumes |
| 1/2 in square | 45 sq ft | 12x24 and larger, back-buttered as well |
Figures are for a flat substrate. A rough or uneven floor takes more, and any tile over 12 in wants thinset combed on the tile back too, which is where the 1/2 in notch figure nearly halves.
Joint volume
Grout coverage by joint width and tile size
Grout follows total joint length, not floor area, so small tile and wide joints punish you twice. Square feet a 25 lb bag covers.
| Tile | 1/16" joint | 1/8" joint | 1/4" joint |
|---|---|---|---|
| 2" x 2" mosaic | 67 | 33 | 17 |
| 6" x 6" | 200 | 100 | 50 |
| 12" x 12" | 400 | 200 | 100 |
| 12" x 24" | 533 | 267 | 133 |
| 24" x 24" | 800 | 400 | 200 |
Anchored to the 200 sq ft a 25 lb bag covers on 12"×12" at a 1/8" joint, which is the rate this calculator uses, and scaled by joint volume from there. Assumes a consistent tile thickness: a thicker tile has deeper joints and covers proportionally less.
Thinset and grout
Tile quantity questions: coverage, joints, batches
The eleven things people ask at the tile counter, answered against the same TCNA and NTCA guidance this calculator is built on.
How many tiles per square foot?
It depends on tile size. A 12x12 tile covers 1 sq ft. A 6x6 tile covers 0.25 sq ft (4 tiles per sq ft). A 12x24 tile covers 2 sq ft (0.5 tiles per sq ft). A 24x24 tile covers 4 sq ft.
How much thinset do I need?
One 50 lb bag of thinset mortar covers about 80 sq ft with a 1/4-inch square notch trowel. Large format tiles need a 1/2-inch trowel and use about twice as much thinset.
How much grout do I need?
One 25 lb bag of sanded grout covers about 200 sq ft of standard 12x12 tiles with 1/8-inch grout lines. Wider grout lines and smaller tiles use more grout.
How wide should tile grout lines be?
1/16 inch suits rectified porcelain, where the edges are cut square after firing. 1/8 inch is the default for most pressed floor tile. Stone, slate and saltillo want 3/16 to 1/4 inch because their edges are not consistent enough to hold a tight line.
How narrow can a cut tile at the wall be?
Keep border cuts at least half a tile wide, and never under 2 inches. Thinner than that and the piece chips on the saw and reads as a mistake. Shifting the field half a tile turns one full tile and one sliver into two equal borders.
Does diagonal layout waste more tile?
Yes. Diagonal layouts waste about 5% more than straight layouts because every edge tile needs an angled cut. Herringbone wastes about 10% more.
Do tile boxes have to come from the same batch?
Yes. Match the batch or dye lot number printed on every box. Two lots of the same product can vary in shade and in thickness, so buy the whole order at once and keep a spare box for repairs.
Porcelain vs ceramic: what is the difference?
Porcelain is denser, harder, and more water-resistant (less than 0.5% absorption rate). It costs more but handles freezing temps and heavy traffic. Ceramic works fine for light-traffic interior floors and walls.
What makes large format tile challenging?
Large tiles (18x18 and bigger) require a perfectly flat substrate, back-buttering, a leveling system, and large-format thinset. They amplify even small subfloor imperfections into visible lippage.
Do I need waterproofing under tile?
In wet areas (showers, steam rooms, bathroom floors) you need a waterproof membrane. Tile and grout are water-resistant but not waterproof. Moisture seeping through joints causes mold and subfloor damage.
Can a beginner tile a floor?
A bathroom floor (under 50 sq ft) with 12x12 tiles in a straight layout is a good beginner project. Large format tiles, shower builds, and complex patterns are better left to experienced installers.
Callbacks
What goes wrong on a tile job, and what to do instead
None of these show up on the day you finish. They show up a season later, and every one of them was decided in the hour before the first tile went down.
Standard thinset under large format tile
A 12×24 or bigger tile needs a mortar that holds its notch and does not slump as the tile settles.
Ask for large-and-heavy-tile mortar by name. Ordinary thinset gives you hollow spots that sound like a drum and pop a year later.
Not back-buttering the big pieces
Combed ridges alone leave air behind the middle of a large tile, and air is where cracks start.
Skim the tile back as well as the floor, then set it. You are aiming for 95% contact in a wet area, 80% anywhere else.
Buying the tile in two trips
The second batch is a different dye lot, and the shade or thickness shift lands as a visible line across the room.
Order the whole job at once, check the batch number on every box, and keep one spare box in the garage for repairs.
Deciding the joint width at the shop
Joint width sets the spacers, the grout type, the grout quantity, and where every border cut lands.
Pick it against the tile edge: 1/16 inch only on rectified tile, 1/8 inch on pressed ceramic, 3/16 to 1/4 inch on stone.
Sanded grout in a thin joint
The aggregate will not pack into a 1/16 inch line, and it scratches polished and glass faces on the way in.
Sanded at 1/8 inch and wider, unsanded below that. On glass mosaic use unsanded whatever the joint measures.
Grouting while the mortar is still green
Kneeling on tile that has not cured breaks the bond you just made and shifts the whole course out of line.
Give it 24 hours, longer in a cold or humid room. Tape a note on the door if anyone else in the house might walk on it.
Treating tile as the waterproofing
Tile and grout shed water; they do not stop it. What gets through soaks the substrate instead.
Liquid or sheet membrane over every shower, tub surround and bathroom floor, taken up the wall past the splash line.
Job sheets
Tile and thinset counts for four real rooms
Four jobs run through this calculator at its default 10% allowance, with the pattern penalty added where there is one. Every figure below is what the tool returns.
Bathroom floor
10 × 6 ft · 12"×12" porcelain · straight
66 tiles · 7 boxes · 1 bag thinset
60 sq ft plus 10%. Both runs leave a border close to a full tile, so a flush set-out off the tub wall works and the cuts stay easy. Membrane under the whole floor, not only the wet corner.
Kitchen backsplash
10 × 3 ft · 6"×6" ceramic · straight
132 tiles · 4 boxes · 1 bag thinset
30 sq ft plus 10%. Small tile means four times the piece count and four times the joint length, so the 200 sq ft per bag figure is optimistic here. Use unsanded grout below 1/8 inch.
Kitchen floor
15 × 10 ft · 12"×24" porcelain · brick offset
87 tiles · 18 boxes · 3 bags thinset
150 sq ft plus 10% plus the 5% offset penalty. Turn the 24 inch side along the 15 ft run and the border lands at 11 inches, just under half a tile, which is the case for balancing.
Full bathroom, floor and wainscot
20 × 10 ft · 18"×18" natural stone · diagonal
103 tiles · 23 boxes · 3 bags thinset
200 sq ft plus 10% plus 5% for the diagonal. Stone wants a wider joint and sealing before and after grouting, and a diagonal field has no square border course at all.
Coverage math
How this tile calculator counts tiles, thinset and grout
Area times the allowance gives the quantity to buy. Everything else divides that figure by a published coverage rate and rounds up, because you cannot buy two thirds of a bag. The pattern penalty is added to your waste slider rather than replacing it, so a herringbone floor at 10% waste is ordered at 20%.
Coverage rates come from TCNA and NTCA installation guidance and from bag ratings, and they assume a flat substrate and the right trowel. A wavy floor swallows mortar and no formula can predict how much, which is the main reason the first bag disappears faster than the last.
The formulas
buy = area × (1 + waste + pattern)tiles = buy ÷ sq ft per tileboxes = buy ÷ 10thinset = buy ÷ 80grout = buy ÷ 200spacers = buy ÷ 50Every division rounds up. Cost covers tile material only, not membrane, trim, levelling clips, saw rental or labour.
Price per foot
Tile coverage and cost per square foot, by tile type
The two lookups worth having open while you shop: what one tile covers, and what the material costs before anyone installs it.
Per 100 is bare coverage with no allowance. A 50 lb thinset bag covers about 80 sq ft, a 25 lb grout bag about 200, and a box holds roughly 10.
Material only. Installation adds $4 to $12 per sq ft depending on tile size and pattern, and a diagonal or herringbone field sits at the top of that range.
Disclaimer
These estimates are for planning purposes only. Actual costs vary by location, material availability, and project complexity. Always get at least 3 local quotes. This calculator does not replace professional advice.
Sources
Related Calculators
Grout Calculator
Pounds of grout by tile size and joint
Carpet Calculator
Square yards, roll length, and cost
Flooring Calculator
Hardwood, laminate, vinyl, carpet
Self-Leveling Concrete Calculator
Subfloor prep and leveler
Square Footage Calculator
Area for irregular rooms
Baseboard Calculator
Trim and molding after tiling