Self-Leveling Concrete Calculator
How much self-leveling compound do I need? Calculate bags, primer, and costs for leveling uneven floors before tile, hardwood, or LVP installation. Enter your floor area and average depth for instant estimates.
Floor Details
15% recommended for uneven subfloors and mixing loss
Ready to calculate
Enter your floor dimensions for self-leveling estimates
Last updated June 12, 2026 by our expert review team
Cost per Bag by Product Type
$/bagPrices based on 50lb bags at national home improvement retailers. Coverage rated at 1/4" depth.
Expert Contributors
Ehsan Ghazanfari
Licensed Structural Engineer
FISE-certified structural engineer with 11+ years designing bridges, retaining walls, and foundations. MSc from Aalto University.
See full profileHawkin
Certified Cost & Estimating Professional
AACE-certified estimator working with 20+ insulation companies including the two largest franchises in America.
See full profileUpdated June 2026
How we verify our calculators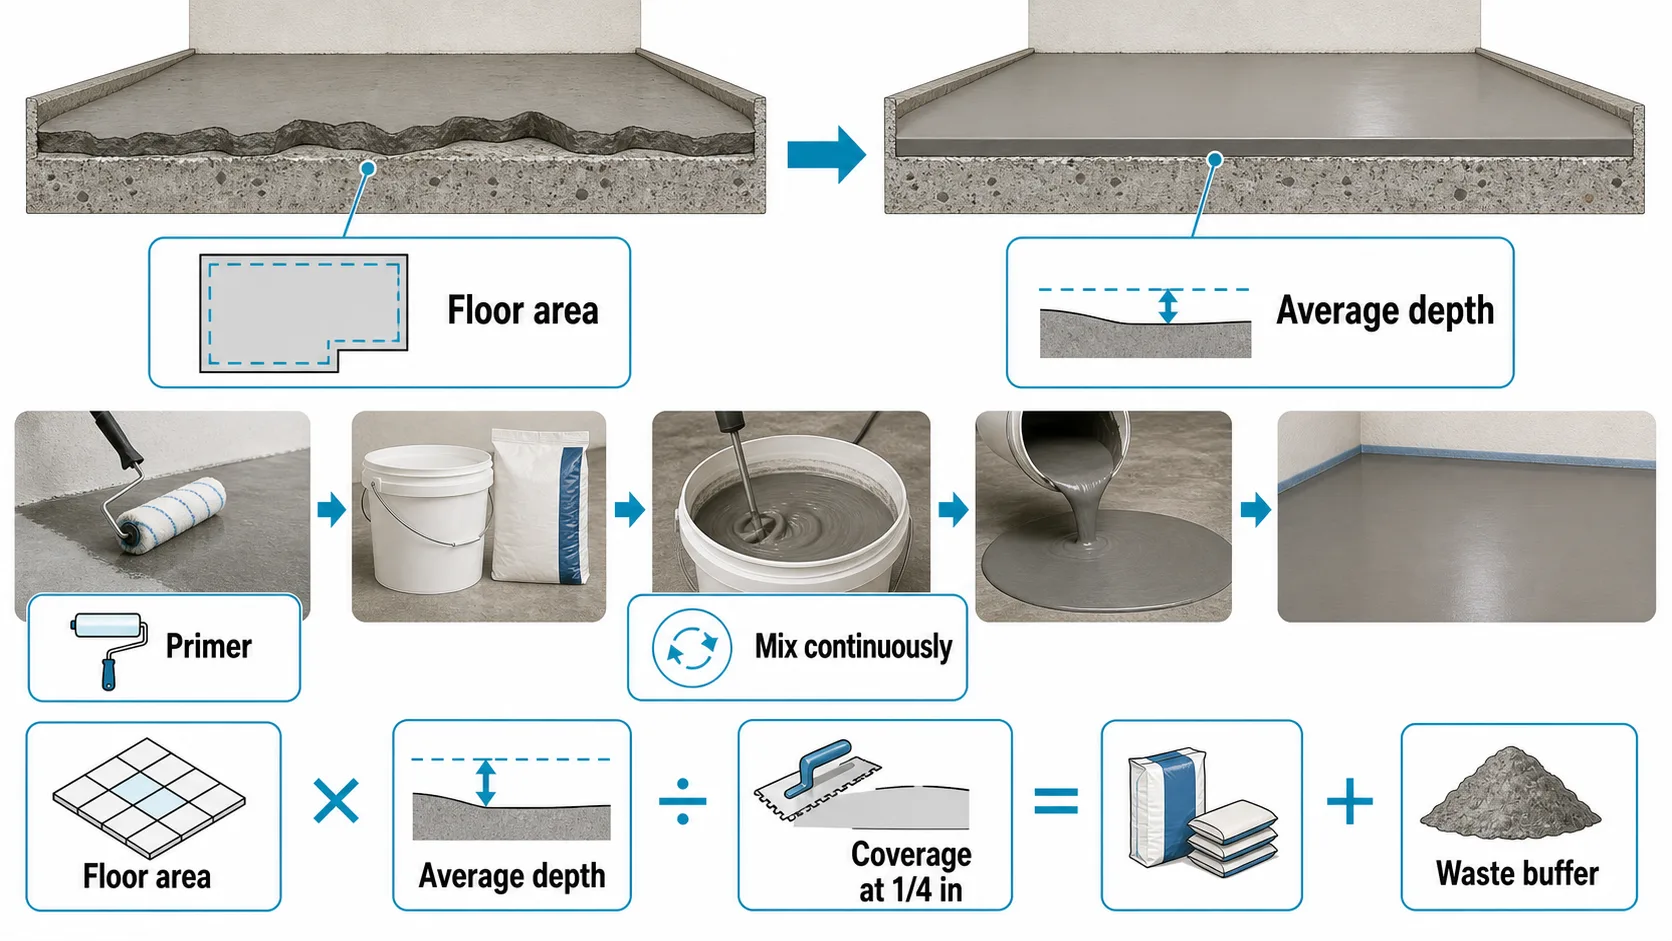
Choose by Floor Condition
Self-leveler is not one product for every floor. Pick the product and prep plan based on surface, depth, working time, and the final flooring.
Clean concrete
Best default for tile, LVP, laminate, or hardwood prep when depth is moderate.
Large room
Use when you need better flow, fewer ridges, and more room to keep a wet edge.
Thin transition
Use at doorways or patched edges where a full-depth pour would create a bump.
Schedule crunch
Useful when time matters, but only if mixing, pouring, and spreading are fully staged.
Measure lows in zones
A single room can have a shallow field and one deep corner. Estimate each zone separately when the floor is not evenly low.
Seal every leak path
Leveler finds gaps under walls, doorways, drains, seams, and pipe penetrations. Foam, caulk, or dam edges before mixing.
Check the next floor
Tile needs flatness, vinyl needs smoothness, and doors need clearance. The target finish changes how perfect the pour must be.
Pro Tips
Map low spots with a straightedge before estimating. One deep dip can use more material than the rest of the room combined.
Average depth is not the deepest spot. If the room has a few isolated low pockets, estimate the weighted average depth across the full pour area.
Buy the same product lot when possible. Mixing standard, quick-set, and feather-edge products in one continuous pour can create flow and cure differences.
Stage water, bags, buckets, drill, gauge rake, spiked roller, and primer before opening the first bag. The clock starts as soon as water hits powder.
After leveling, use the flooring calculator to estimate tile, hardwood, laminate, or LVP coverage.
For structural slabs, footings, or thick concrete pours, use the concrete slab calculator. Self-leveler is an underlayment, not a structural slab.
For wood subfloors, confirm the product allows plywood, then follow the lath, primer, and deflection requirements on the bag. Skipping that prep causes cracking.
Work with a helper on pours over 100 sq ft. One person mixes while the other places and spreads, so each batch blends into the last one.
Installing tile after leveling? The tile calculator estimates tile, thinset, grout, and spacer quantities.
How the Calculator Works
This calculator treats self-leveler as a depth-adjusted coverage problem. Bag labels usually state coverage at 1/4 inch, but real floors have low spots, feathered edges, and waste from mixing and spreading.
1. Area
Length times width gives the pour area. For L-shaped rooms, calculate each rectangle and add them.
2. Depth
Average depth adjusts the bag coverage. Deeper pours reduce coverage in direct proportion.
3. Rounding
Bags and primer round up. Running short mid-pour can leave cold joints and ridges.
What the estimate includes
The result includes bag count, material cost, total bag weight, primer allowance, and adjusted coverage at your depth. It does not include patching cracks, grinding high spots, lath for wood floors, dams at doorways, tools, labor, or floor-covering materials.
Formulas
Floor Area = Length x Width
Adjusted Coverage = Base Coverage x (0.25 / Actual Depth in inches)
Bags = Floor Area / Adjusted Coverage x Waste Multiplier, rounded up to whole bags
Volume = Floor Area x Depth x Waste Multiplier
Primer = Floor Area / 300 sq ft per gallon, rounded up to whole gallons
Quick Reference
- Standard bag
- 50 lbs
- Coverage at 1/4"
- 25 sq ft/bag
- Primer coverage
- 300 sq ft/gal
- Max single pour
- 1" typical
- Working time
- 15-20 min
- Walk-on time
- 2-6 hours
Common Questions
How do I estimate average depth for an uneven floor?
Mark the low spots with a straightedge, then think in zones. If half the room needs 1/4 inch and half barely needs material, the average is closer to 1/8 inch. If one corner is very low, calculate that area separately and add it to the main room.
Why does bag count jump so fast when depth increases?
Coverage is rated at a specific thickness, usually 1/4 inch. Doubling the depth roughly cuts coverage in half, so a 25 sq ft bag at 1/4 inch covers about 12.5 sq ft at 1/2 inch.
Which product type should I choose?
Use standard self-leveler for typical tile, LVP, or laminate prep. Use high-flow for larger rooms where working time and flow matter. Use feather-edge for very thin transitions. Use quick-set only when schedule matters and the crew is ready to work fast.
Do I need primer before self-leveling compound?
Yes. Primer controls suction, improves bond, and helps prevent air bubbles from rising into the pour. Porous concrete may need more primer or a second coat, depending on the product instructions.
Can I pour over plywood?
Only if the product is approved for wood subfloors and the floor is stiff enough. Many systems require primer, metal or plastic lath, sealed seams, and minimum thickness over the highest point.
How much waste should I add?
Use 10% for a smooth, well-measured slab. Use 15% for normal uneven rooms. Use 20% or more when low spots are hard to measure, the substrate is rough, or the crew is new to pouring self-leveler.
Is self-leveling concrete a DIY project?
Small bathrooms, closets, and laundry areas can be DIY-friendly. Large rooms, deep pours, wood subfloors, radiant heat, or pours that must meet tile flatness specs are much less forgiving.
When should I grind high spots instead of pouring more leveler?
Grind small high ridges before pouring. Self-leveler fills lows, but it does not make high spots disappear. Removing high areas can cut bag count and reduce the thickness at doorways and transitions.
Project-Specific Self-Leveling Playbooks
Bathroom Before Tile
10x6 ft, 1/4" avg depth
3 bags, 150 lbs
Plan: Use standard self-leveler, dam the doorway, and check tile flatness before setting layout lines.
Watch: Toilet flange height and shower transitions can become problems if the pour adds too much thickness.
Kitchen Before LVP
15x12 ft, 1/4" avg depth
9 bags, 450 lbs
Plan: Stage two buckets and keep batches moving. LVP needs smooth transitions more than a perfectly level room.
Watch: Cabinet toe kicks, dishwasher clearance, and doorway reducers can all tighten after the pour.
Basement Slab Correction
20x20 ft, 1/2" avg depth
37 bags, 1,850 lbs
Plan: Treat this as a crew job. Use high-flow material, multiple mixing stations, and a gauge rake.
Watch: Moisture, cracks, drains, and slab movement should be handled before placing an underlayment.
Whole-Floor Renovation
40x20 ft, 1/4" avg depth
37 bags, 1,850 lbs
Plan: Divide the job into planned pour zones only if the product allows it. Keep each edge wet when working continuously.
Watch: Long open rooms show ridges, lap lines, and waves. A pro crew may be cheaper than fixing a bad pour.
Pre-Pour Checks That Prevent a Bad Leveling Job
Vacuum and prime the floor
Dust, laitance, paint, adhesive residue, and unprimed concrete can break the bond or create pinholes in the finished surface.
Dam every opening
Self-leveler runs under walls, doorways, tub edges, pipe penetrations, floor registers, and drains if they are not sealed first.
Use the water ratio on the bag
Too little water leaves ridges. Too much water weakens the surface and can cause segregation or cracking.
Plan continuous mixing
A batch that lands after the previous one has started to set can leave lap lines, ridges, and color or texture changes.
Grind high spots first
Leveler fills low spots. It does not erase humps. Grinding can save bags and keep thresholds from getting too tall.
Confirm floor covering timing
Walk-on time is not the same as ready-for-flooring time. Follow the product schedule for tile, vinyl, wood, or moisture-sensitive adhesives.
Important Disclaimer
These estimates are for planning purposes only. Actual costs vary by location, material availability, and project complexity. Always get at least 3 local quotes. This calculator does not replace professional advice.