Recessed Lighting Calculator
Calculate how many recessed lights a room needs, plus spacing, wall offset, wattage and cost.
Room Details
Estimates only. Not professional advice.
Recessed lights needed
12
3 rows of 4 in a 15 by 12 ft living room, on the 4 ft grid a 8 ft ceiling sets.
- Room area
- 180 sq ft
- Connected load
- 144 W
- Energy, 8 hr a day
- $50 a year
- Fixtures, 6"
- $240 to $540
- Lamps, LED
- $96
- Materials, 12 lights
- $336 to $636
Materials only, at $28 to $53 a light. Wiring and labour are separate and usually larger.
Last updated August 13, 2026. Spacing geometry checked against IES definitions by our expert review team.
Ceiling plan
Recessed lighting spacing, drawn on the ceiling you are wiring
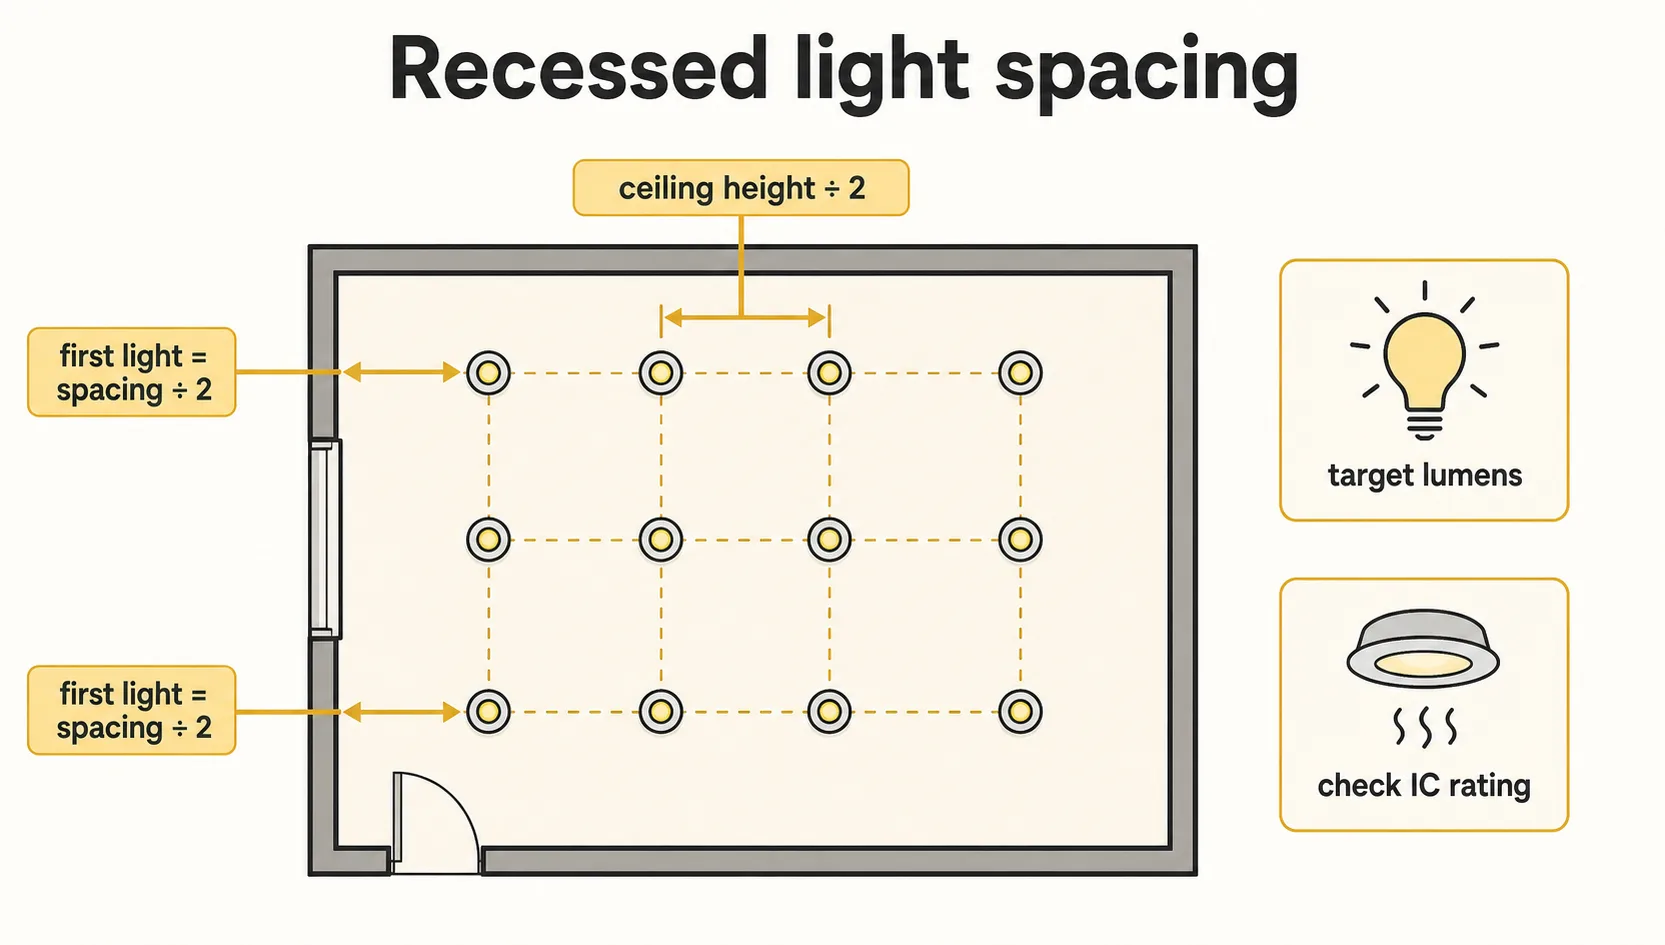
Below is your ceiling seen from underneath, to scale, with the fixtures at their real trim diameter. The count comes from the calculator. What the drawing adds is where the holes actually go, which is not at the nominal spacing.
- Wall offset, all four sides
- half the 4.0 ft nominal spacing
- 2.0 ft
- On centre along the run
- 4 fixtures across 15.0 ft
- 3.7 ft
- On centre between rows
- 3 rows across 12.0 ft
- 4.0 ft
Ceiling height divided by two is the beam circle of a 40 degree downlight over a 30 in work plane. Yours are 90 degrees, so one fixture already covers 11.0 ft and the grid is about 2.7 times tighter than coverage alone needs. The extra fixtures buy evenness and lumens, not reach.
Room by room
How many recessed lights a room needs, and what really sets the number
Two answers compete and the larger one wins. Brightness asks for a lumen total. Coverage asks for a grid. On a flat 8 foot ceiling the grid wins in almost every room, which is why changing a kitchen to a bedroom often changes nothing at all.
Living Roomyours
20
4 lights
12 lights
The grid, at 12. The lumen target is already met with 8 fixtures to spare.
Kitchen
40
7 lights
12 lights
The grid, at 12. The lumen target is already met with 5 fixtures to spare.
Bedroom
15
3 lights
12 lights
The grid, at 12. The lumen target is already met with 9 fixtures to spare.
Bathroom
40
7 lights
12 lights
The grid, at 12. The lumen target is already met with 5 fixtures to spare.
Home Office
30
5 lights
12 lights
The grid, at 12. The lumen target is already met with 7 fixtures to spare.
Hallway
10
2 lights
12 lights
The grid, at 12. The lumen target is already met with 10 fixtures to spare.
Figures are for your own 15.0 ft by 12.0 ft room at 8.0 ft, with LED lamps at 12 W. Change the room or the ceiling above and every row moves with it.
Four ceilings
Recessed lighting layouts for four rooms, counted and costed
Same LED lamps and 6" trims throughout, so the only thing moving is the ceiling. Three of the four are set by the grid. The vaulted one is the exception that shows what the lumen target is for.
12 × 12 · 8 ft clg
9
3 × 3 · 4.0 ft o.c.
Bedroom, flat ceiling
The commonest small-room layout. Three rows of three, and the lumen target never gets a look in.
108 W · $38 a year · $252 to $477 in materials
15 × 12 · 8 ft clg
12
3 × 4 · 4.0 ft o.c.
Kitchen, flat ceiling
Double the lumen target of a living room and the count does not move, because the same grid already fills the ceiling.
144 W · $50 a year · $336 to $636 in materials
16 × 4 · 8 ft clg
4
1 × 4 · 4.0 ft o.c.
Hallway
Too narrow for a second row, so the whole run is one line down the middle of the ceiling.
48 W · $17 a year · $112 to $212 in materials
16 × 14 · 14 ft clg
9
2 × 3 · 7.0 ft o.c.
Kitchen, vaulted
The one case where brightness wins. A high ceiling thins the grid, and the lumen target has to put the fixtures back.
108 W · $38 a year · $252 to $477 in materials
Counts, wattages and costs come from the same tables the calculator reads, so they move with the lamp and trim you pick above. Energy is 8 hours a day at $0.12 per kWh.
Before you cut holes
Recessed lighting questions: spacing, IC ratings, circuit limits
The eight things people ask once the ceiling is marked and the hole saw is out, answered against the same tables this calculator reads.
How many recessed lights for a 12x12 room?
Nine at an 8-foot ceiling. The 4-foot grid that the ceiling height sets puts three rows of three in the room, and at that height the grid outranks the lumen target for every room type.
How far apart should recessed lights be?
Ceiling height divided by 2 is the shortcut: 4 feet apart on an 8-foot ceiling, 5 feet on a 10-foot ceiling. The honest version measures up from the surface you are lighting rather than the floor, and widens as the beam angle widens.
What size recessed light should I use?
6-inch for general room lighting. 4-inch for accent or task lighting. 5-inch as a middle ground. 6-inch is the most common for residential.
LED vs halogen recessed lights?
LED uses 75% less energy, lasts 7x longer, and runs cooler. LED costs more upfront ($8 vs $4) but saves $30 to $50 per bulb over its lifetime.
How much does it cost to install recessed lighting?
$150 to $300 per light for new construction with wiring. $75 to $150 for remodel/retrofit into existing ceilings. DIY fixtures cost $20 to $45 each.
Do recessed lights need to be on the same circuit?
Yes, typically. A 15-amp circuit handles up to 12 LED recessed lights. A 20-amp circuit handles up to 16.
Can I install recessed lights in insulated ceilings?
Only with IC-rated (Insulation Contact) fixtures. Non-IC fixtures must have 3 inches of clearance from insulation.
How much do recessed lights cost to run?
12 LED recessed lights at 12W each cost about $50 per year running 8 hours daily at $0.12/kWh. Halogen costs about $210/year for the same setup.
Circuit questions are load questions. Size the breaker with the amp calculator, and the raceway feeding it with the conduit fill calculator.
Dark spots and scallops
Where a recessed lighting layout goes wrong
Five failures, in the order they bite. Every one of them produces a ceiling plan that looks reasonable on paper and reads badly once the lights are on.
Taking ceiling height divided by 2 as a law
It is the beam circle of a roughly 40 degree downlight over a work plane, which is a halogen flood. It says nothing about the fixture you actually bought.
Check the beam spread on the box. A wide LED wafer covers far more floor at the same height, so the grid can thin out without going patchy.
Measuring the drop from the floor
Light lands on the counter, the desk or the table, not the carpet. Measuring to the floor overstates the throw by the height of the surface.
Subtract the surface height first. A 30 inch work plane takes 2.5 ft off an 8 ft ceiling before any spacing arithmetic starts.
Putting the perimeter fixtures a full spacing off the wall
An interior fixture lights a strip a full spacing wide, half of it on each side. A perimeter fixture only has room on one side, so a full offset leaves the wall dark.
Half the spacing, every time. On an 8 ft ceiling that is 2 ft off the wall, which is where the old 2 to 3 foot rule of thumb comes from.
Using the same offset for a wall you want lit
Half the spacing is right for a wall that is background. Aim a downlight at that distance at artwork or cabinetry and it lights the floor in front of it instead.
Move in. The wash starts one foot below the ceiling when the fixture sits a foot times the tangent of the half angle off the wall, which is inches, not feet.
Chalking the grid at the nominal spacing
The count is a ceiling, so the last fixture in a run lands short of the far wall and the room reads lopsided.
Fix the two wall offsets first, then divide what is left by one less than the count. The result is always at or under the nominal spacing.
None of the five is a code question. IC rating, clearance from insulation and circuit capacity are, and they are the ones that fail an inspection rather than an eye.
Chalk line order
Setting out a recessed lighting grid, in the order it has to happen
This one is a sequence, not a list of tips. Each step closes off a choice the next step depends on, and the commonest way to end up with a lopsided ceiling is doing step five first.
- 01
Measure the room, then subtract the surface
Spacing is set by the height above what you are lighting, not the ceiling height. A 30 in work plane takes 2.5 ft off before anything else happens. Get the room area right first with the square footage calculator if the room is not a plain rectangle.
- 02
Read the beam spread off the box, not off the size
Trim diameter tells you nothing about coverage. A 6" wafer can be 120 degrees and a 4" accent can be 25. The beam is what decides how far apart the holes can go.
- 03
Set the spacing, then halve it for the wall offset
Every fixture owns a strip of ceiling one spacing wide. The ones against a wall only have room on one side, so they own half a strip and sit at half the spacing off the wall.
- 04
Decide which walls you are washing
A wall that is just background gets the half-spacing offset. A wall carrying artwork, stone or cabinetry wants its own row much closer in, measured in inches rather than feet.
- 05
Divide the leftover span, do not step off the nominal
Fix the two offsets, count the fixtures, then divide what is between them by one less than the count. That lands the run symmetrically and always at or under the nominal spacing.
- 06
Check the joists before you chalk anything permanent
A ceiling joist under a mark moves that fixture, and moving one fixture in a row means re-dividing the whole run. Find the framing first and let it break ties.
- 07
Size the circuit and the raceway last
Count the connected watts, then confirm the breaker and the wire. Our amp calculator covers the load side and the conduit fill calculator the pipe.
Spacing by ceiling height
Recessed light spacing chart, with the beam angle it quietly assumes
The first three columns are the shortcut every layout guide prints. The last two are what it implies, measured above a 30 in work plane: the beam that makes the shortcut exactly right, and what your 90 degree fixtures actually cover at that height.
| Ceiling | Spacing | Wall offset | Above surface | Beam assumed | Your beam covers |
|---|---|---|---|---|---|
| 8yours | 4.0 | 2.00 | 5.5 | 40° | 11.0 |
| 9 | 4.5 | 2.25 | 6.5 | 38° | 13.0 |
| 10 | 5.0 | 2.50 | 7.5 | 37° | 15.0 |
| 12 | 6.0 | 3.00 | 9.5 | 35° | 19.0 |
| 14 | 7.0 | 3.50 | 11.5 | 34° | 23.0 |
The assumed beam narrows as the ceiling rises, because the shortcut scales with ceiling height while the throw scales with the height above the surface. Beam spread here is the angle at which intensity falls to a stated fraction of peak, which is what a manufacturer publishes.
Cone geometry
How this recessed lighting calculator sets the count and the spacing
Two answers, and the count is the larger. The lumen answer is a division. The grid answer is a cone, and the whole argument on this page is about what that cone is actually pointed at.
The count is whichever answer is larger
lights = max(⌈lumens ÷ per lamp⌉, rows × per run)Brightness: room area at the level for that room type
lumens = area × lumens per sq ftMounting height is measured from the surface being lit, not the floor
h = ceiling height − surface heightThe circle one downlight throws on that surface
D = 2h × tan(beam ÷ 2)Even light means the circles meet, which is the IES spacing criterion
SC = spacing ÷ hThe shortcut this calculator uses for the grid
spacing = ceiling height ÷ 2Which is exactly the circle of this beam, and no other
beam = 2 × atan(ceiling height ÷ 4h)A perimeter fixture owns half a strip, so it sits half a spacing off
wall offset = spacing ÷ 2A wall you want lit is different: the wash starts this far down
x = drop × tan(beam ÷ 2)What moves the number
- Room area and the lumen level for that room type.
- Lamp output, as watts times lumens per watt.
- Ceiling height, through the spacing grid and the wall offset.
- Trim size and lamp type, through the material cost only.
What it leaves out
- Wall, ceiling and floor reflectance, which a full lumen-method calculation would use.
- Beam spread, deliberately: it redraws the plan above and does not move the count.
- Sloped and vaulted ceilings, where the height varies across the room.
- Fixture efficiency, so delivered lumens sit below the lamp figure.
- Dimming, colour temperature and the joists that decide where a can can go.
The work plane here is the IES default, a horizontal plane 0.76 m above the floor.
Disclaimer
These estimates are for planning purposes only. Actual costs vary by location, material availability, and project complexity. Always get at least 3 local quotes. This calculator does not replace professional advice.
Sources