Concrete Countertop Calculator
Count 80 lb bags, sealer and seam weights for a concrete countertop run.
Countertop Details
Finish Type
Countertop mix to order
5
bags of 80 lb countertop mix, which is 2.99 cu ft of concrete with the 15% waste allowance already in it.
- DIY materials
- $167 to $313
- Fabricated for you, basic (trowel finish)
- $167 to $313
- DIY material per sq ft
- $8 to $15
A basic (trowel finish) finish is priced at $8 to $15 per sq ft fabricated and installed. That is the same rate as the DIY material line, so on a trowel finish the two totals match; grinding, staining and veining are what a shop charges more for. The weight above is the mix you buy, waste included. The seam plan below takes that allowance back out, because what you lift is slab and not spare mix. Estimates only, not professional advice.
Last updated August 5, 2026 by our expert review team.
At the form
Concrete countertop tips that decide how the slab comes out
Not a sequence, so not numbered. Each of these is the difference between a slab that reads as stone and one that reads as a driveway offcut, and every one is settled before the concrete goes in.
Buy a countertop mix, not a general concrete mix. The difference is aggregate size and cement content, and on a face you run your hand across every day it is the whole job. Coarse gravel in a general mix will read through a trowelled surface.
On a 1.5 in pour, fibre beats welded mesh. Steel or PVA fibre works through the whole section, so there is nothing rigid sitting close enough to the face to telegraph through it.
Vibrate the form until the surface stops giving up air. An orbital sander with no paper on it, held flat against the form sides and the underside, is the cheap version of a vibrating table. Pinholes are air you left behind.
Seal with a food-safe penetrating sealer rather than a topical film. Penetrating sealers soak in and cannot peel. A film wears through first exactly where people chop and set down hot pans.
Cast each piece inside 6 to 8 ft, and decide the seams before you build a single form. Longer pieces crack while they cure and stop being liftable, which is what the plan below is for.
Cost the mix and the whole job separately. Our concrete bags calculator checks the bag count against a bulk order, and the concrete cost calculator is the one to use if you are weighing DIY against a fabricator quote.
An outdoor kitchen base or a bar support is a structural pour with different rules. Size it with our concrete slab calculator, not with this one.
- Slab thickness, standard
- 1.5 in
- Counter depth, standard
- 25 in
- Weight per sq ft at 1.5 in
- 18.75 lb
- Longest piece planned for
- 8 ft
- Forms come off at
- 24 to 48 hours
- Full cure
- 28 days
- Sealer, two coats
- 2 oz per sq ft
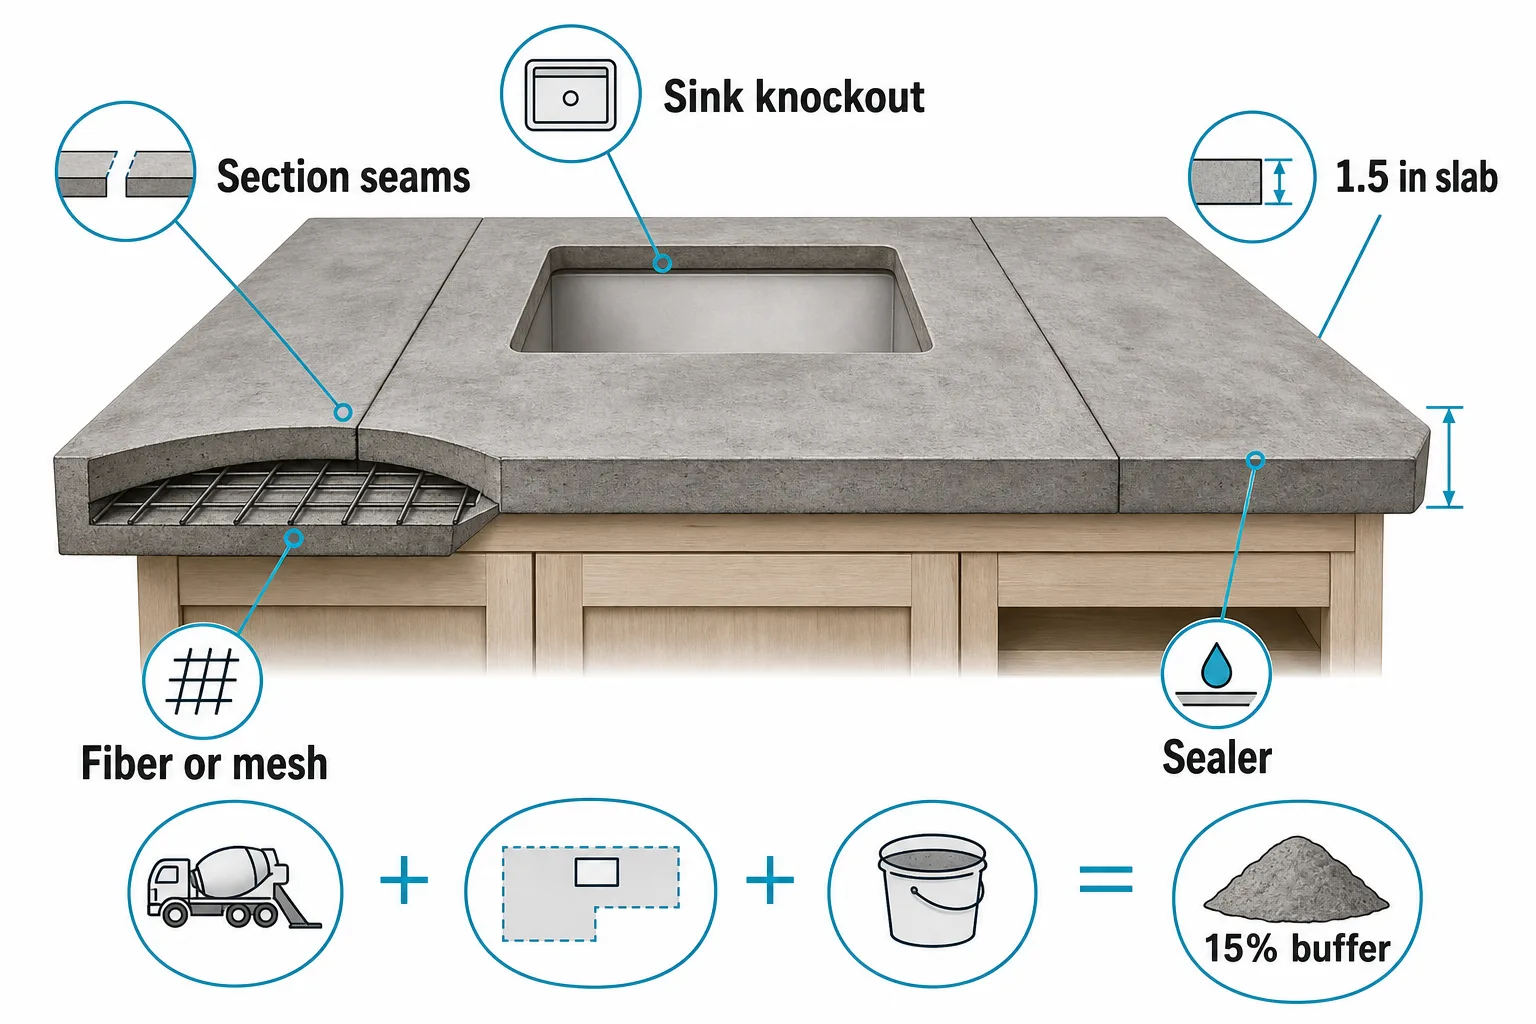
Thickness, the sink knockout, the seams, the reinforcement, the sealer and the waste buffer are one decision, not six. Change any of them and the others move.
Seam plan
Where the seams fall on a concrete countertop run
A run this long is cast in pieces, and the piece has to be liftable by the people who are actually there on the day. Depth and thickness are what set the weight of every foot of it, so they, not the length, are usually what forces another seam.
Plan and edge share one scale, so a slab this thin against a counter this deep is the real proportion. Seams are drawn at the equal divisions the calculator uses, and changing the piece count moves them.
Every piece is inside the 8 ft mark. Add a piece and the weight per lift falls while the number of joints you have to shim and fill goes up, which is the whole trade-off.
Load per ft of run is depth times thickness times 150 lb per cubic foot, so at 25 in deep and 1.5 in thick this run carries 39 lb in every ft. Take the slab up by 0.5 in and that becomes 52 lb, which is how a thicker top quietly turns a two-person lift into something else. Weight per person is the figure to judge: this page publishes no safe lift ceiling, because that depends on the people, the reach across a base cabinet and how far the piece has to travel.
Bad places for a joint
Three places a countertop seam must not land
Over an appliance gap
A dishwasher, a range or a beverage fridge leaves no cabinet under the joint. A seam needs something bearing on both sides of it, and a piece this heavy cantilevered over an opening is how a corner breaks off.
Through the sink cutout
The slab is already at its narrowest front to back around the bowl. Running the seam through that stacks two weak points in the same place, and it is the wettest part of the counter.
Somewhere you cannot reach to fill
Every joint gets shimmed level and filled with colour-matched silicone after the pieces are set. If the seam lands hard against a wall return or behind a fixed appliance, that work has to happen before the piece next to it goes down.
Priced pours
Concrete countertop cost by size: four worked pours
Each of these runs through the same arithmetic as the calculator above, so you can type any of them in and get the identical answer. Piece weights leave the waste allowance out, because waste is spare mix rather than extra slab.
Galley kitchen run
4
bags of 80 lb mix
$133 to $250 DIY
- Run
- 8.0 ft
- Depth
- 25 in
- Counter
- 16.7 sq ft
- Pieces
- 2 at 4.0 ft
- Each piece
- 157 lb
Two pieces, each short enough for two people to carry up a hallway. The obvious seam is wherever the base cabinets already break.
L-shaped kitchen
8
bags of 80 lb mix
$250 to $469 DIY
- Run
- 15.0 ft
- Depth
- 25 in
- Counter
- 31.3 sq ft
- Pieces
- 3 at 5.0 ft
- Each piece
- 195 lb
Three pieces, and the corner takes one of the seams whether you plan it or not. Put the second one away from the sink, not through it.
Kitchen island
5
bags of 80 lb mix
$144 to $270 DIY
- Run
- 6.0 ft
- Depth
- 36 in
- Counter
- 18 sq ft
- Pieces
- 1 at 6.0 ft
- Each piece
- 338 lb
Cast in one piece so the top has no joint anywhere a person sits. The extra depth is what makes it heavy, not the length.
Bathroom vanity
2
bags of 80 lb mix
$59 to $110 DIY
- Run
- 4.0 ft
- Depth
- 22 in
- Counter
- 7.3 sq ft
- Pieces
- 1 at 4.0 ft
- Each piece
- 138 lb
Under a bag of mix and light enough for one careful lift. The usual first project, and an integral basin mould is worth trying here.
All four assume a 1.5 in slab and a 15% waste allowance. If you are weighing cast concrete against grinding and sealing the slab you already have, our polished concrete floor calculator prices the other approach.
Fabrication desk
Concrete countertop questions people ask before the first pour
Eight answers in roughly the order they come up, starting with what the whole thing costs and how much of it you will be carrying.
How much do concrete countertops cost?
DIY materials run $8 to $15 per sq ft. Professional fabrication and installation costs $30 to $100+ per sq ft depending on the finish. A basic 20 sq ft kitchen counter costs $160 to $300 DIY or $600 to $2,000 professionally installed.
How heavy are concrete countertops?
Concrete weighs about 150 lbs per cubic foot. A standard 1.5-inch thick countertop weighs roughly 18 to 19 lbs per sq ft. A 10-foot section can weigh 300+ lbs, so plan for help during installation.
How thick should concrete countertops be?
Standard thickness is 1.5 inches (38mm). Thicker pours (2 to 3 inches) add unnecessary weight. You can create the look of a thick edge by using a drop-front edge form without adding bulk to the entire slab.
How often do you seal concrete countertops?
Reseal every 1 to 3 years depending on use. High-traffic kitchen counters need resealing yearly. Bathroom vanities can go 2 to 3 years. Use a food-safe penetrating sealer, not a topical film.
Are concrete countertops hard to DIY?
Moderate difficulty. The pour itself is straightforward, but building precise forms, achieving a smooth finish, and handling heavy sections requires patience. Budget a full weekend for your first project.
What concrete mix should I use for countertops?
Use a countertop-specific mix like Quikrete Countertop Mix or Buddy Rhodes. Regular concrete has large aggregates that create a rough surface. Countertop mixes use fine sand and higher cement ratios for smooth results.
How do you cut sink and faucet holes?
Create knockout forms from melamine or foam before pouring. Place them in the mold at the exact sink dimensions plus 1/8 inch for clearance. Cut faucet holes after curing with a diamond hole saw.
How long do concrete countertops take to cure?
Remove forms after 24 to 48 hours. Light sanding and sealing after 3 to 5 days. Full cure takes 28 days, but countertops are functional after 7 days with a good sealer applied.
Finish pricing
Concrete countertop cost per sq ft by finish
Five finishes on one axis, so the step from a trowelled face to a veined one is the real step and not a chart trick. The right-hand figure is that rate applied to the counter you just measured.
Basic (Trowel Finish)
your finish$8 to $15
$167 to $313
Polished/Ground
$15 to $30
$313 to $625
Acid Stained
$20 to $35
$417 to $729
Embedded Objects/Aggregate
$25 to $45
$521 to $938
Veined/Marbled
$30 to $50
$625 to $1,042
Fabricated and installed by a shop. Doing it yourself puts the material bill at $8 to $15 per sq ft whatever finish you go for, because the difference is grinding, staining and time rather than mix.
Bag count
How this concrete countertop calculator counts bags and weight
Length times depth gives the counter area, area times thickness gives the concrete, waste goes on after that, and the answer rounds up because nobody sells two thirds of a bag.
area = length × depth ÷ 12volume = area × thickness ÷ 12 × (1 + waste)bags = ceil(volume ÷ 0.6)weight = volume × 150mesh = ceil(area × 1.1)sealer = ceil(area × 2)piece = length ÷ piecesDepth and thickness are entered in in and divided down to feet, which is why a slab this shallow in section still needs its own arithmetic. Nothing is deducted for the sink: a knockout saves you a fraction of a bag and it is the one place you least want to run short. The mesh figure is the counter area plus 10% for the overlaps, and sealer covers two coats.
Not included: the melamine for the forms, screws and caulk for building them, release agent, fibre or mesh, polishing pads, colour-matched silicone, the cabinet boxes underneath, or your time.
Pour sequence
Pouring a concrete countertop, in the order it happens
This one is genuinely sequential, and most of the mistakes further down are somebody taking a step out of order. Everything up to the pour is joinery; the concrete part takes an afternoon.
- 01
Build the mould from melamine at the finished size of each piece, and cast face down. The bottom of the mould becomes the surface you live with, so it is the one that has to be flat and unscratched.
- 02
Block out the sink before any concrete goes in. A melamine or foam knockout at the sink dimensions plus 1/8 inch of clearance, set in the mould. Faucet holes come later, drilled with a diamond hole saw once the piece has cured.
- 03
Set the reinforcement to suit the section. Fibre through the mix at 1.5 in, mesh only where the slab is deep enough to bury it well below the face.
- 04
Mix and pour the whole piece in one go, then vibrate. A cold joint between two batches inside a single piece will show up in the finish and there is no fixing it afterwards.
- 05
Strike off level with the mould rim, cover, and leave it alone. Forms come off at 24 to 48 hours, not sooner, or the edges chip as they release.
- 06
Grind or polish to the finish you chose, fill the pinholes with a slurry of the same mix, then seal at 3 to 5 days. Full cure is 28 days; the counter is usable from about 7 days once it is sealed. Mix design and finishing are their own craft, and the Concrete Countertop Institute is the standard reference for both.
- 07
Set the pieces, shim until the faces are level across every joint, then fill the seams with a colour-matched silicone. Silicone stays flexible, which is what a joint between two heavy slabs needs.
Remakes
Concrete countertop mistakes you cannot sand out
Six ways a countertop pour gets thrown away. Every one is decided before the mix goes in, and none of them is fixable on a finished piece.
Using a general concrete mix
The large aggregate in a general mix leaves a pitted, gravelly face. Countertop mixes use fine sand and a higher cement ratio because they are made for a surface that gets looked at.
Not vibrating the form for long enough
Air trapped against the form face becomes pinholes and voids. Give it at least five minutes with an orbital sander held flat against every form wall and the underside.
Stripping the forms early
Wait 24 to 48 hours. Concrete pulled out before initial set chips at the edges and cracks at the corners, and both defects are on the visible face.
Leaving it unsealed
Bare concrete takes up water, oil and wine in minutes. Apply a food-safe penetrating sealer within 5 to 7 days of the pour and reseal every 1 to 3 years.
Casting one long piece with no joints
Past 8 ft a piece cracks while it cures and stops being liftable. Break the run into 6 to 8 ft pieces and fill the joints with silicone, which is what the seam plan above is working out.
Deciding the seams after the forms are built
Seam positions are a layout decision, not a cutting decision. Once the melamine is screwed together the joint lands wherever you happened to stop, which is how a seam ends up over a dishwasher.
Disclaimer
These estimates are for planning purposes only. Actual costs vary by location, material availability, and project complexity. Always get at least 3 local quotes. This calculator does not replace professional advice.
Sources